Create a new extension
Learn the basics of extension development by creating, testing, and publishing an extension using the Netlify SDK.
For a complete working example of an extension built with SDK v2, refer to the Netlify extension showcase repository.
Prerequisites
Section titled “Prerequisites”Windows users should run the Netlify SDK through WSL 2
Support for using the Netlify SDK on Windows is currently only available through WSL 2.
- Node.js 20.12.2 or later
- Netlify CLI
- TypeScript
1. Create an extension with the SDK
Section titled “1. Create an extension with the SDK”To create a new extension with the Netlify SDK, run the create command using npm, pnpm, or yarn.
pnpm create @netlify/sdk@latestyarn create @netlify/sdk@latestnpm create @netlify/sdk@latestFollow the prompts:
- Install the
@netlify/create-sdkpackage. - Specify where to create the extension.
- Supply extension information, including:
- A slug to use as the unique identifier for your extension and to create the package name. Once you publish an extension with this slug, you can’t change it.
- Select the boilerplate code you want to generate.
- At minimum, you need to select
Extension UIbecause all extensions need to define UI for users to configure their extension. - If you prefer not to use a boilerplate, select
noneand follow the prompts to provide the permission scopes that the extension needs to function properly.
- At minimum, you need to select
- Select the package manager you want to use.
For example, you might select the Extension UI and Edge functions boilerplate to create an extension that will inject an edge function into the user’s project during the build step. The extension UI boilerplate will include a surface that we can customize to request certain information from the user when they configure the extension.
When the process completes, your selected directory will have the files you need to start building your extension and will include some example boilerplate code. Learn about the required files in the anatomy of an extension doc.
2. Set up local development
Section titled “2. Set up local development”To set up local development and test your extension locally, you need to first deploy the extension on Netlify and publish it as a private extension on your team. The local development server uses the deployed extension’s configuration file (extension.yaml) to determine what surfaces to render in the local version of the Netlify UI.
- Push to a Git repository
- Create a project to host the extension
- Create a private extension
- Start the local development server
- Install and check your extension’s surfaces
- Stop and clear local development settings
For each extension you develop, you only need to complete steps 1-3 once to set up local development. Afterwards, you can jump straight to step 4 to start testing locally.
Push to a Git repository
Section titled “Push to a Git repository”If you haven’t already, push your extension code to a Git repository. Netlify will pull code from that repository in the next step.
Create a private extension
Section titled “Create a private extension”As a Team Owner, publish the extension as a private extension so you can preview it locally and then test it in production. Private extensions are only available to your team.
- In the Netlify UI, select the Extensions tab for your team.
- Select Created by your team and then select Create an extension.
- Select your Git provider and then follow the prompts to log in and authenticate.
- Find and select the repository that contains your extension code.
- Choose a name for the project that will host the extension’s artifacts and functions. It will not be visible to users.
- Deploy the project.
- Enter a Display name, Slug, and Summary.
- Select the Permission scopes for your extension.
- Select Create extension.
- The last step is to update the slug in your project’s
extension.yamlto include the nanoid that the Netlify UI added during the publishing flow:- In the Netlify UI, select the Extensions tab for your team and select Created by your team.
- Find the extension you just created and select it to go to the extension’s details page.
- Select Manage and find the Slug under Details.
- Copy the slug and paste it in your project’s
extension.yamlfile. - Commit the update to Git, push the change to your repository, and redeploy the project that hosts your extension code.
Learn more about publishing extensions and the publishing workflow.
Start the local development server
Section titled “Start the local development server”The SDK includes support for a local development server that you can run to preview and test your extension UI.
Extension surfaces not loading? Make sure you deploy and publish
To run an extension locally, you need to first deploy it as a Netlify project and publish it as a private extension. If you skip these steps, the local development server won’t render your extension’s surfaces.
Make sure you also redeploy whenever you update the surfaces in extension.yaml to ensure the local development server reflects the latest configuration.
-
Run the following command to start the local development server:
pnpm run dev --openyarn run dev --opennpm run dev --openThis command will start a local server and automatically open your browser to the extension development settings page in the Netlify UI. Only the authenticated user can access this URL.
-
On the local extension development page, review and save your settings. By default, the settings use the URL of your local server and the extension’s slug from the
extension.yamlfile but you can edit them as needed.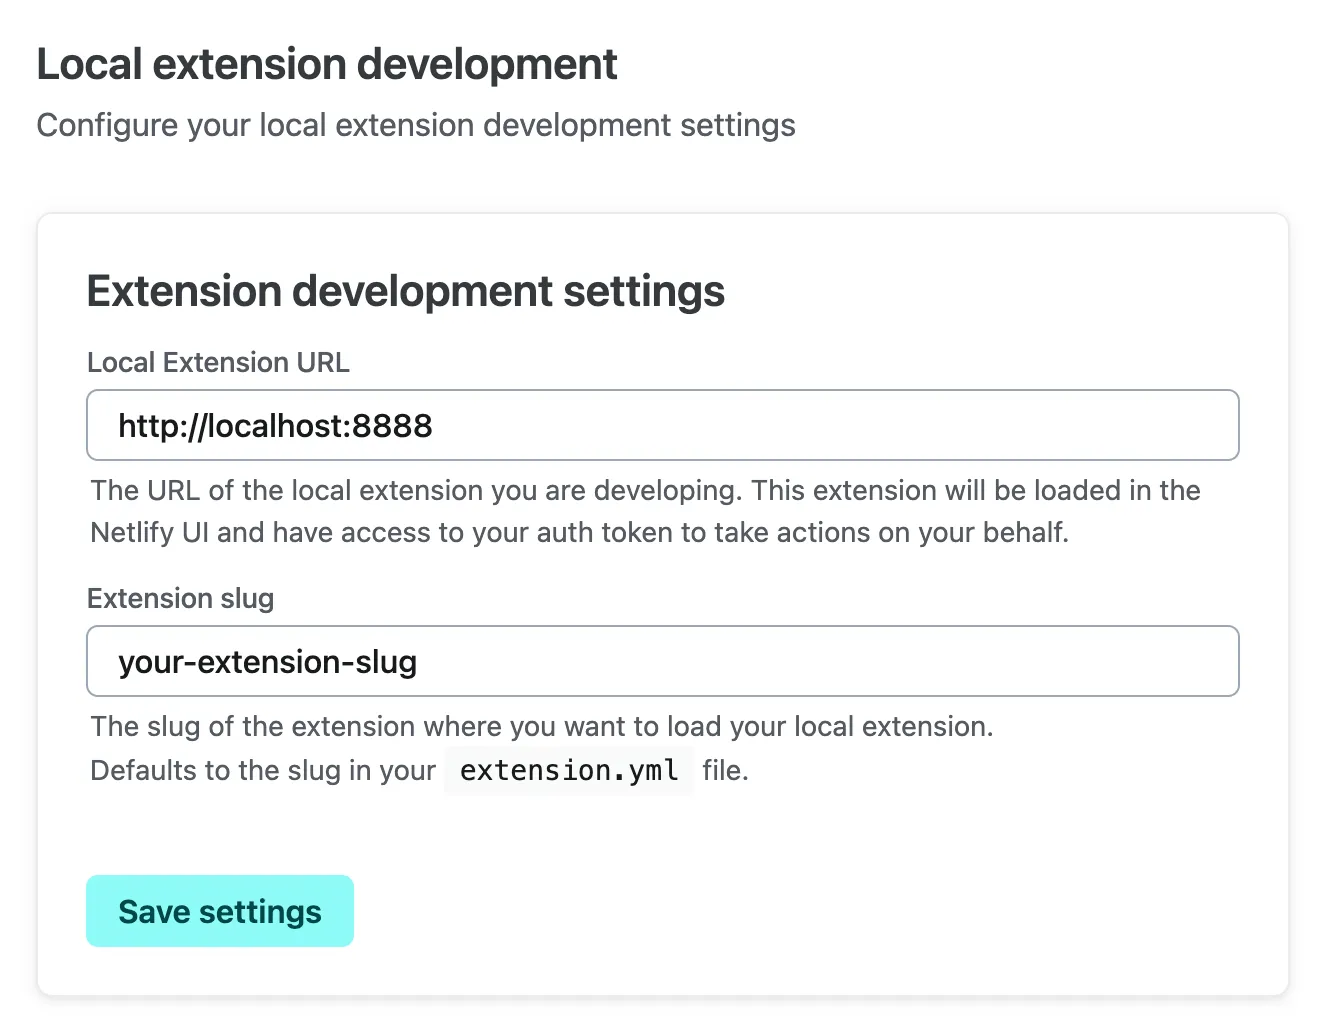
The Netlify UI saves these settings in your browser’s local storage and will persist them across sessions, so only you will be able to access the local development version of the extension.
Learn more about developing locally with extension UI.
Install and check your extension’s surfaces
Section titled “Install and check your extension’s surfaces”Now that you have the local development server running, you can install and review your extension surfaces in the Netlify UI:
-
Select your team name at the top of the Netlify UI, and then select Extensions.
-
Select Created by your team and find your private extension in the list.
-
Select the extension and then select Install on the details page.
Note that this will actually install the extension on your team in production and it will remain installed even after you stop the local development server.
-
You can now navigate to the various sections in the Netlify UI that contain your surfaces. For each of these surfaces, the Netlify UI will load the surface using the local development URL instead of the deployed version.
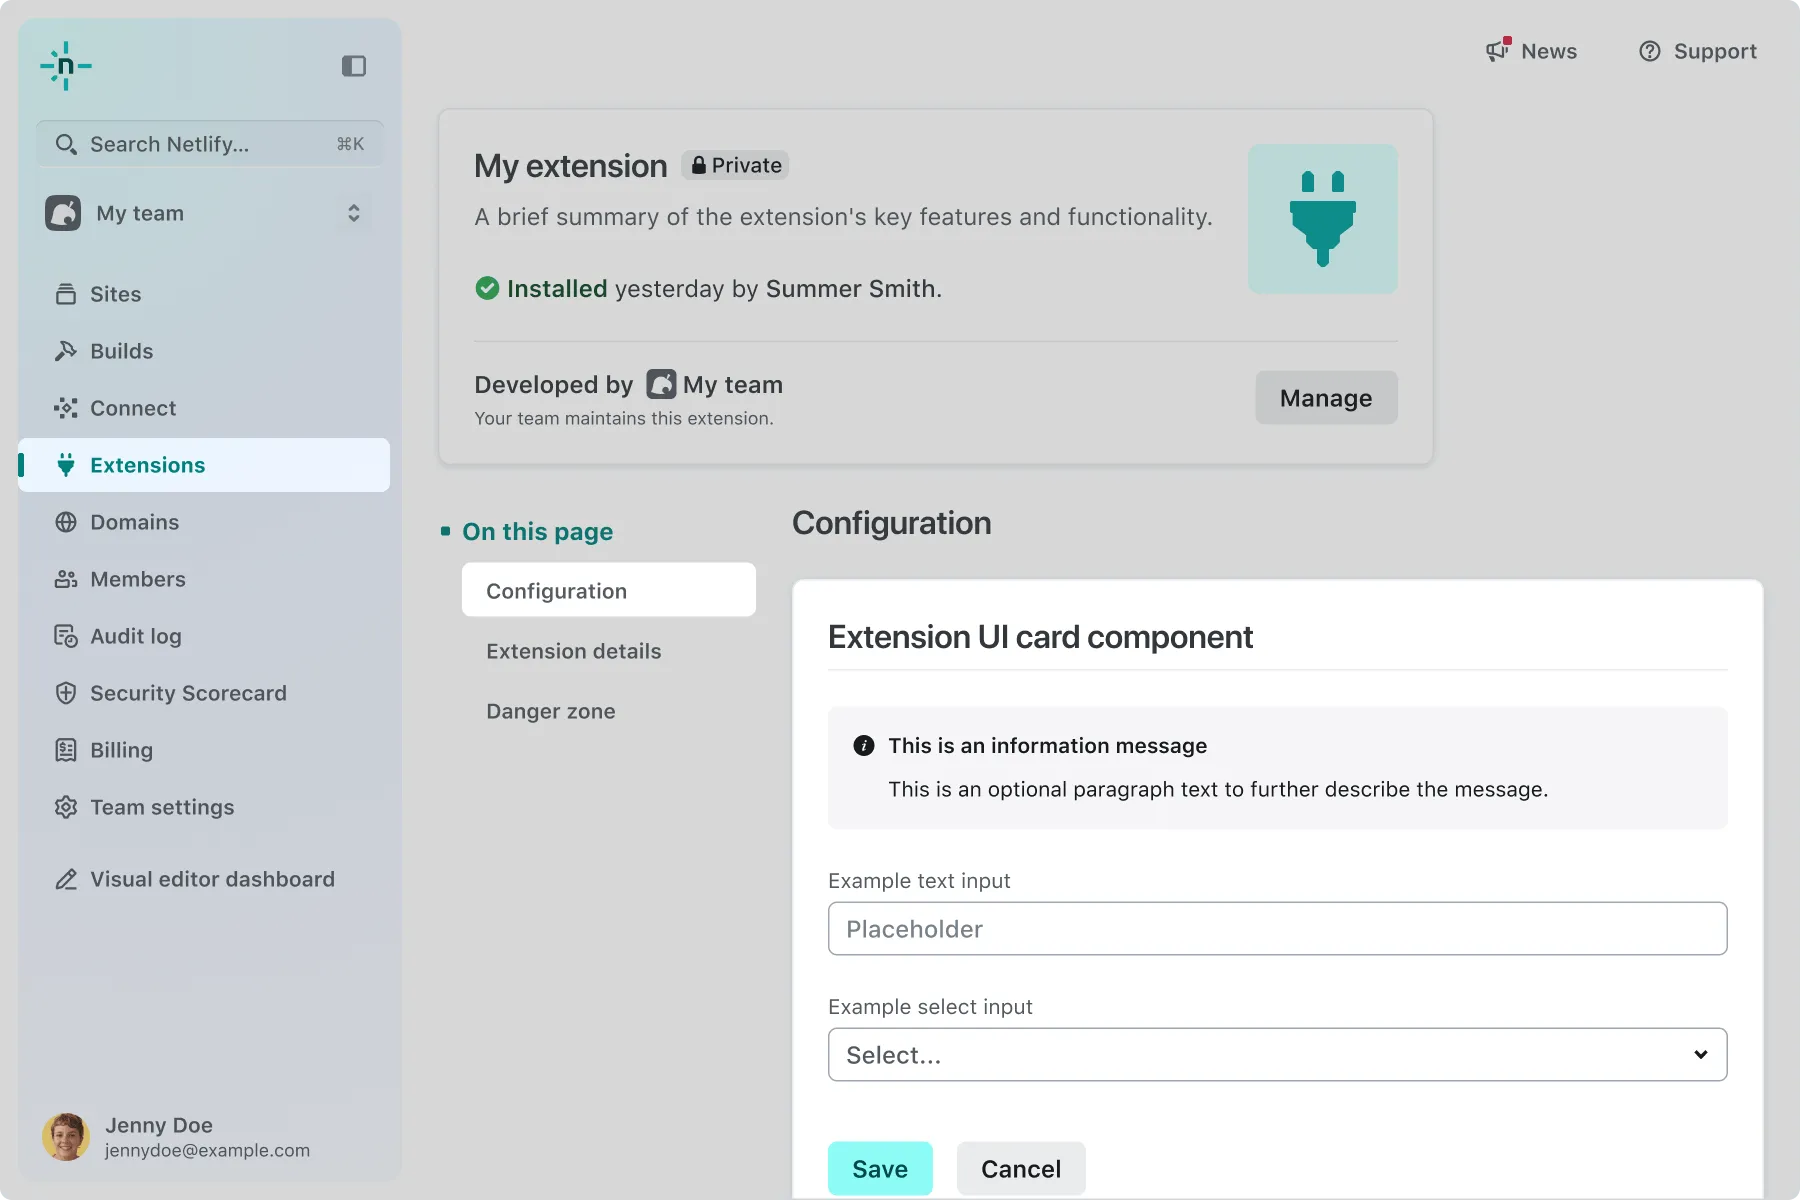
For example, if you selected the Extension UI and Edge functions boilerplate, you will find a configuration surface rendered:
-
on the extension’s details page under Extensions > [your extension’s details page] > Configuration
-
in a section listed under the top-level navigation for a project on your team
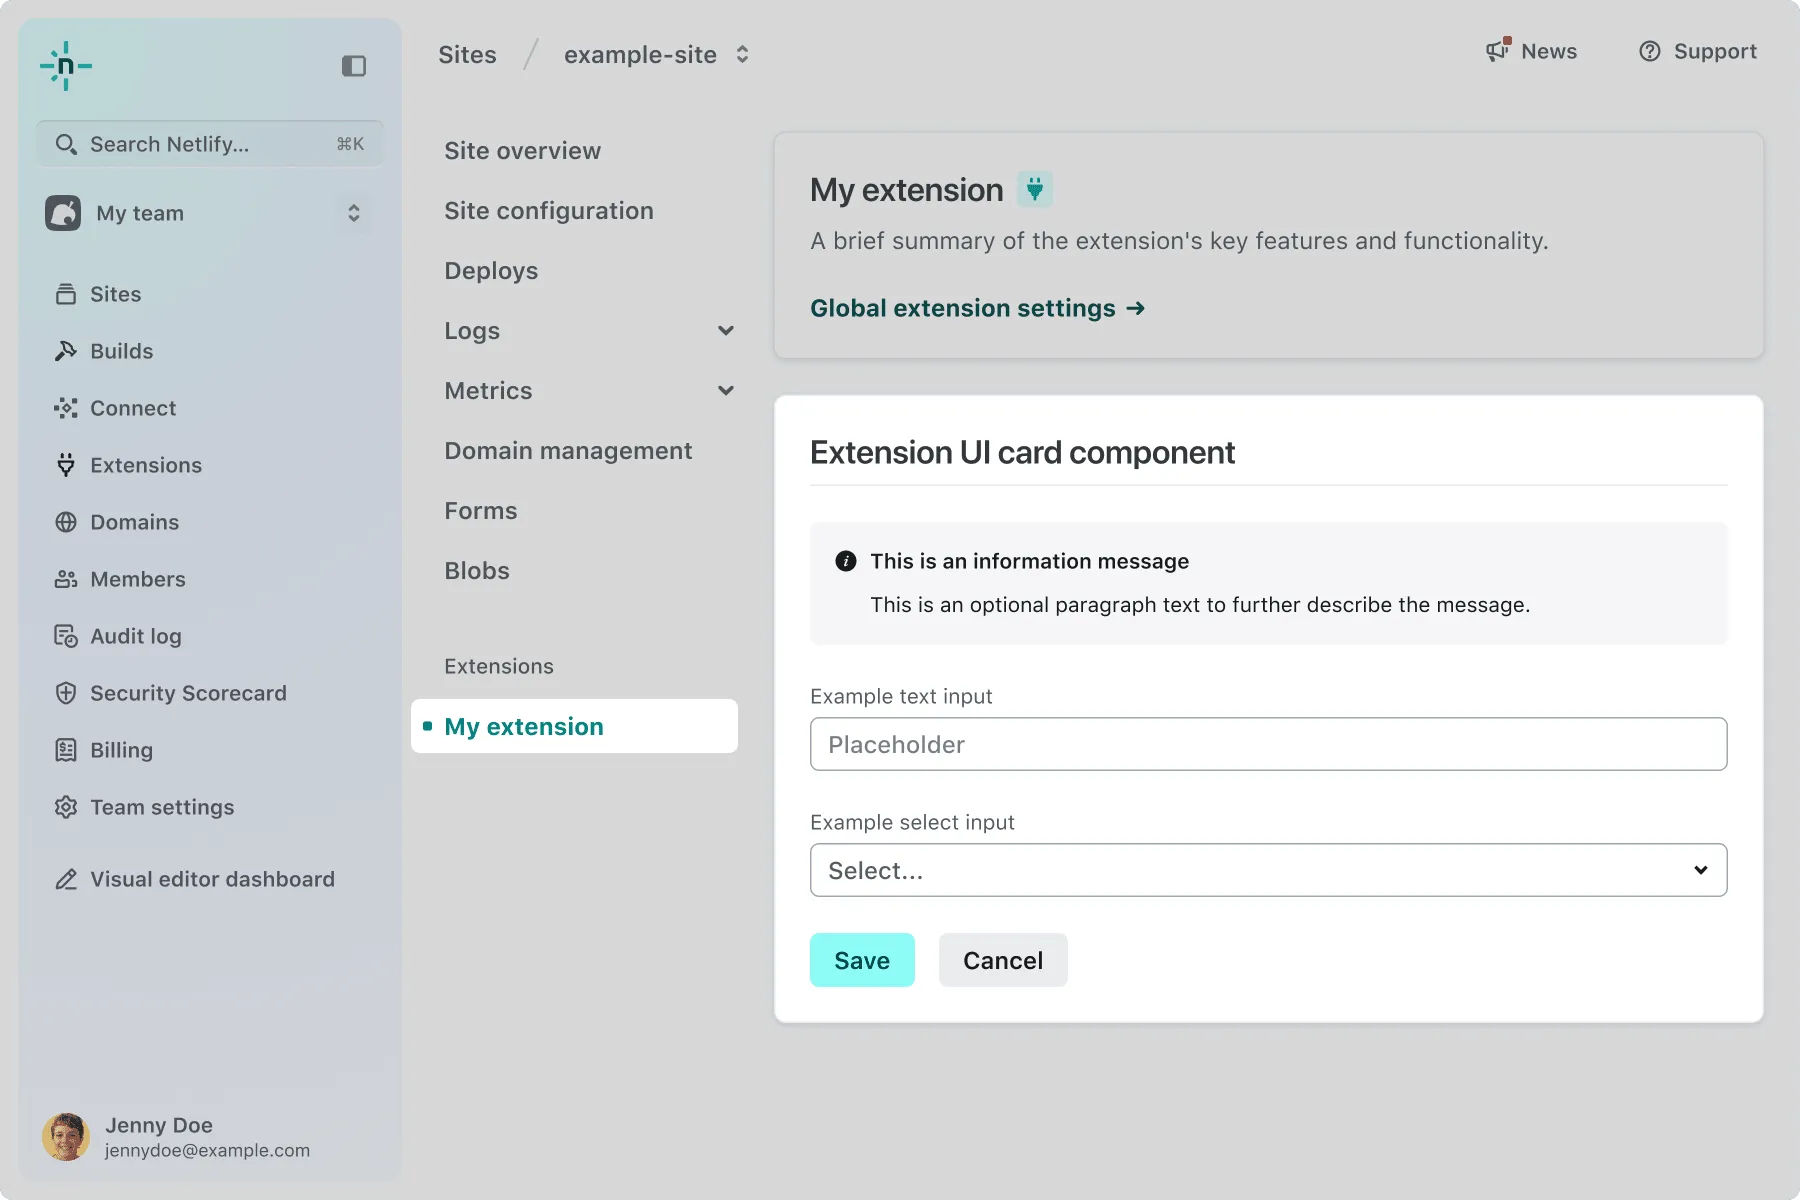
Learn more about extension UI and adding surfaces.
Stop and clear local development settings
Section titled “Stop and clear local development settings”Once you’re done testing locally, follow these steps to stop local development and clear the local settings stored in your browser.
- Stop the dev command process running in your terminal.
- In your browser, navigate back to the extension UI settings and select Delete settings. After you delete these settings, the Netlify UI will stop using the local version of your extension and will render the deployed surfaces from the published extension instead.
3. Customize the extension
Section titled “3. Customize the extension”Now that you have generated the boilerplate code and have the extension set up to develop and test locally, you can use the NetlifyExtension and NetlifyExtensionClient APIs to add custom logic and functionality as needed.
Learn more about how to develop the functionality for your extension in the following docs sections:
Extensions reliant on build events run on every project on a team
After a user installs your extension, all logic related to build event handlers, function injection, and edge function injection runs during the build step for every project the team owns. It is important to be mindful of this and ensure your extension includes logic to early return if specific configuration is missing, for example, to minimize unnecessary impact to user projects and build times.
4. Test in production
Section titled “4. Test in production”When you’re ready, you can test your extension in production. At this point, you should have already deployed and published your extension as a private extension while setting up local development. You can test the same private extension in production.
Make sure to stop and clear your local development settings
Before you test in production, make sure you stop and clear your local development settings. Otherwise, the app will render the local version of your extension.
To test in production:
- In the Netlify UI, navigate to the Extensions > Installed section for your team and confirm that your private extension is installed.
- Navigate to the various sections in the Netlify UI to review your extension UI surfaces and configure your extension as needed.
- Test the extension on your project.
5. Publish a public extension
Section titled “5. Publish a public extension”In some cases, you may want to keep the extension private for only your team to use. If you want to make your extension available to others outside of your team, review our publishing docs to learn more about the publishing workflow. When you’re ready, you can publish it as a public extension.
Make sure you update the details.md file to add the recommended documentation for your users before you publish.
More resources
Section titled “More resources”The following related resources may also be helpful to review:
- Installation flow
- Partner extensions
- Manage published extensions
- Netlify extension showcase repository
- Reference docs.
Contact us for support
Section titled “Contact us for support”If you have questions or run into issues while creating your extension, please contact us through Netlify support or through the technology partner program.