This is an outdated guide
This guide uses SDK v1 and is now deprecated. Learn more about SDK v2 here.
In September 2023, Netlify announced the General Availability of the Netlify Software Development Kit (SDK). This release means that developers have all the tools at their disposal to write an integration with Netlify and supercharge their workflows. What does building an integration look like, and how much effort it is it? Let’s take a look.
#TL;DR
In this example we will show how we were able to build an integration with Upstash with the Netlify SDK. This post will not go through every single line of code, but will instead focus on a few key snippets of code that will help give some insight into how we built this integration.
You can explore the full source code of this integration to find some useful examples of how we built a fully functioning integration with Upstash.
#How will it look?
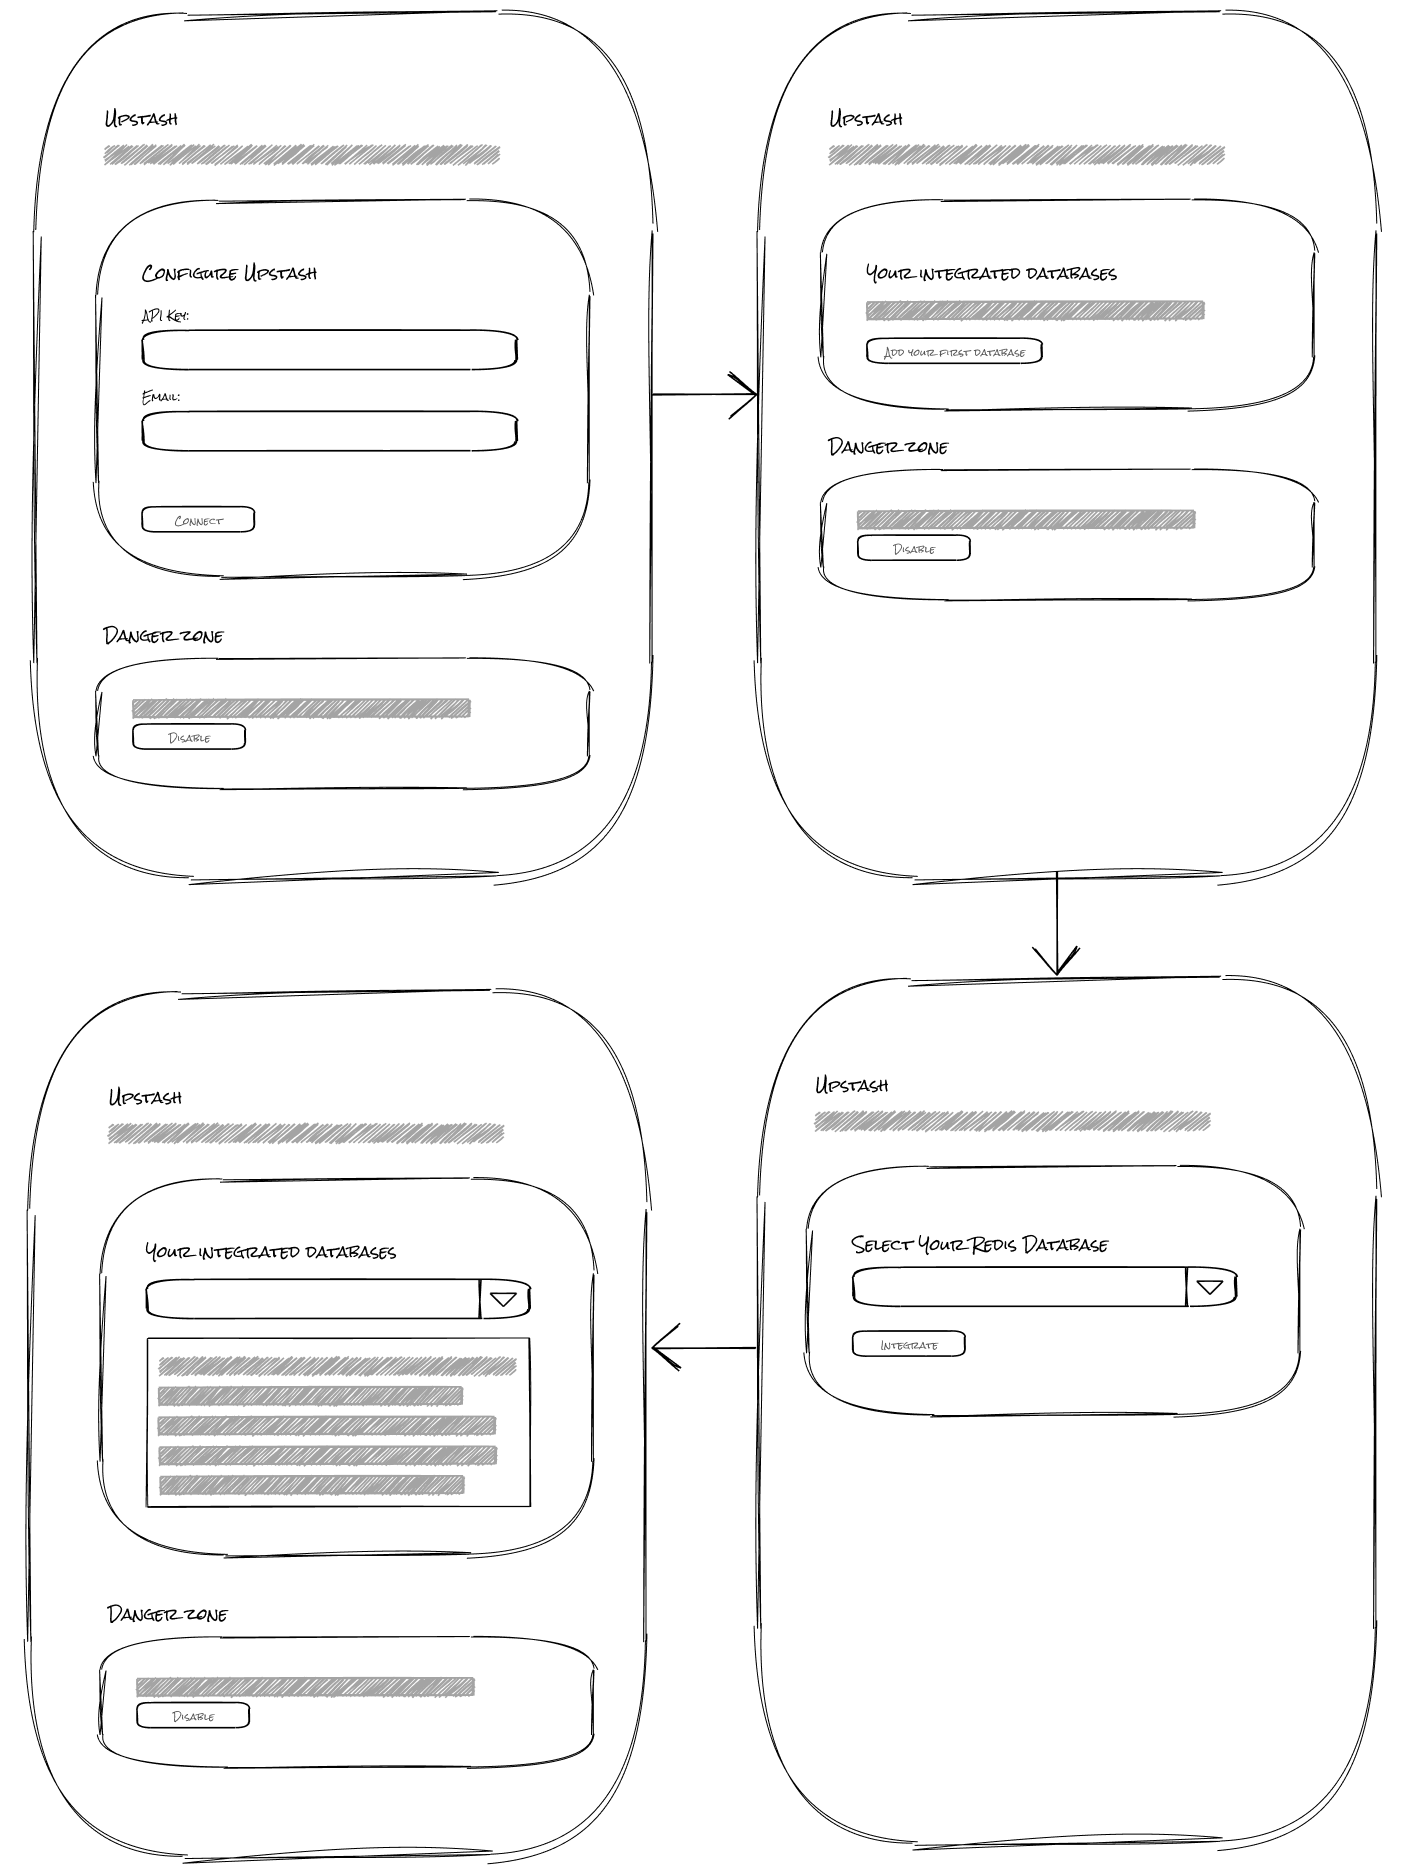
Here is what the Upstash integration looks like and hopefully this post will give you some inspiration on how you can build an integration with the SDK.
#What is Upstash?
“Upstash offers developers serverless databases and messaging platforms to build powerful applications without having to worry about the operational complexity of running databases at scale.”
For anyone looking for a key value store to host data for their application, Upstash is a great place to go to. It’s an ideal choice for projects requiring a scalable and low-latency key-value store, providing a cost-effective and developer-friendly solution for applications where simplified data hosting is crucial.
For example, imagine creating a real-time polling application where users can instantly participate in polls, cast their votes, and witness live updates of poll results. By integrating Upstash, you streamline the storage and retrieval of poll data in a serverless database, eliminating the need to manage operational complexities. This enables you to concentrate on enhancing the polling features and user experience, as Upstash effortlessly manages scalability and ensures low-latency responses essential for an engaging and dynamic polling application.
#Why build this integration?
This integration will provide its users with the benefit of easily connecting with their Upstash databases on a Netlify site level, including code snippets that help users make requests to their databases from Netlify edge functions.
The reason we are able to provide these quick and easy code samples is because we can use the Netlify SDK to create environment variables for the database instances we have access to. We will demonstrate how we can do this later.
#How will this integration work
For this integration the flow should be relatively simple.
- Collect the users’ Upstash API key and email address and store it
- Create a flow for the user to select and integrate with an Upstash Redis database. This will trigger the logic to create all the necessary environment variables to connect to this database
- Once an Upstash Redis database has been integrated with, the user will be able to copy code snippets that show them how to connect to that database instance via their application
#Writing some code!
The docs for our SDK give you the option of choosing pre-built integration templates or starting from scratch with npm create @netlify/sdk@latest that will give you boilerplate to suit your needs, based on your answers to the prompts.

When prompted we chose to make this a site level integration, so that this integration can be setup separately for each individual site. Our docs help you choose what level of integration is right for you, by explaining the options.
#Previewing our integration
Whilst we write this integration, we are going to run a local server to preview it. We can run this with npm run preview and visiting https://app.netlify.com/ui/preview/netlify-upstash-integration?server=http://localhost:8899. On this preview page, you can select a site that you want to test the integration on and refresh the preview each time you introduce new elements to the integration.
#Defining our integration context
As our integration is going to need to store the users’ Upstash configuration, we need to make use of the Integration API to store this data. We call this data the integration context and we would recommend that you create a zod schema to define the shape of this context. For this integration, our config will be relatively simple:
// src/index.ts
import { z } from "@netlify/sdk";
export const siteConfigSchema = z.object({  apiKey: z.string().nullable(),  email: z.string().email().nullable(),  databases: z    .array(      z.object({        name: z.string(),        id: z.string(),      })    )    .nullable(),});
We can then define a type definition that all of our API handlers will use, so that when using the context argument we know what the object will look like.
// src/index.ts
import { FunctionHandler, NetlifySDKContext, z } from "@netlify/sdk";
type UpstashIntegrationContext = NetlifySdkContext<z.infer<typeof siteConfigSchema>>;
export type UpstashIntegrationHandler = FunctionHandler<UpstashIntegrationContext>;#Configuring routes
For users to enable our integration, they will have to browse to the integrations directory (https://app.netlify.com/sites/<site-name>/integrations/database) and enable the integration from the integration card.
Once the integration is enabled we will be taken to https://app.netlify.com/sites/<site-name>/integrations/database/upstash. While every integration requires a / route, the option to include additional routes allows you to effectively compartmentalize the user experience across multiple pages.
Based on the designs, we are going to have two routes:
- Root integration page -
/ - Integrate database page -
/integrate-database
The root integration page will be the page where the user lands when they enable your integration. For this example it would be, https://app.netlify.com/sites/<site-name>/integrations/database/upstash .
The /integration-database route is where users will land when they have clicked the CTA to add a new database to the integration, taking them to: https://app.netlify.com/sites/<site-name>/integrations/database/upstash/integrate-database .
To keep our code organised, I’m going to create separate files for these routes so our src/ui/index.ts page will look like this:
// src/ui/index.ts
import { NetlifyIntegrationUI } from "@netlify/sdk";
import integrateDatabase from "./routes/integrateDatabase";import root from "./routes/root";
const integrationUI = new NetlifyIntegrationUI("integration-upstash-sdk");
const surface = integrationUI.addSurface("integrations-settings");
surface.registerRoute(integrateDatabase);surface.registerRoute(root);
export { integrationUI };#Connecting to Upstash
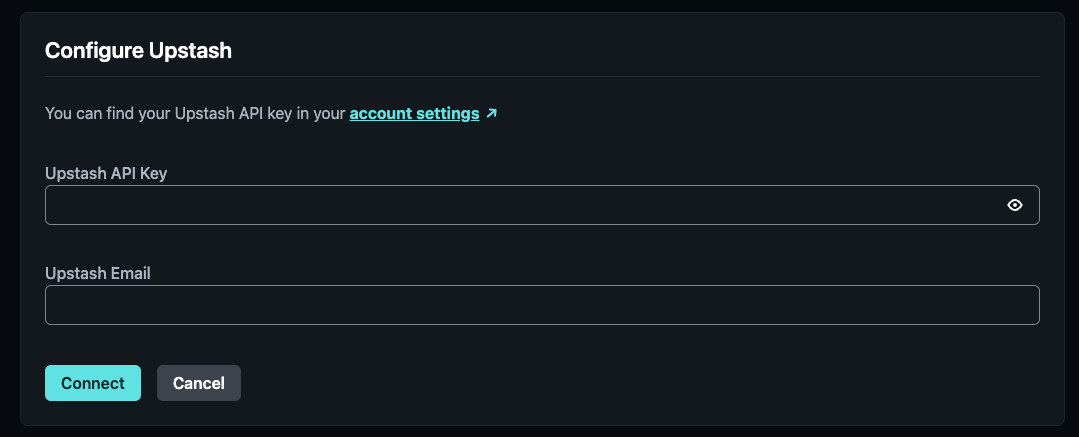
Next up we will dive into / route and add our form to collect the API key and email address of the user for Upstash. This is where we make use of the components made available to use with the Netlify SDK. Here we can see how we use these components to collect the users’ Upstash configuration and store them securely with the integration API:
// src/ui/routes/root.ts
route.addSection(  {    id: "intro-section",    title: "Upstash",    description: "Easily configure your Upstash account",  },  section.addForm(    {      display: "hidden",      id: "connect-form",      title: "Configure Upstash",      savingLabel: "Connecting",      saveLabel: "Connect",      onSubmit: async (state) => {        const { fetch, picker, integrationNavigation } = state;
        const apiKey = picker.getFormInputValue(          "connect-form",          "upstash-api-key",        );        const email = picker.getFormInputValue(          "connect-form",          "upstash-email",        );
        if (!apiKey || !email) {          return;        }
        // TODO - Make call to API handler to store this information      },    },    (form) => {      form.addText({        value:          "You can find your Upstash API key in your [account settings](https://console.upstash.com/account/api)",      });      form.addInputPassword({        id: "upstash-api-key",        label: "Upstash API Key",      });      form.addInputText({        id: "upstash-email",        label: "Upstash Email",      });    },  ););
If we take a look at our preview environment, this his how the configuration section will now look:
#Adding API handlers
You will see that we’ve left ourselves a TODO to actually store the users’ Upstash configuration when it’s submitted. Not only does Netlify let you create a UI for your integration, it also provides an easy way to create API handlers to handle requests from the UI and execute any logic that is required for your integration.
We are going to add an API handler, with the integration.addApiHandler() method and make use of the NetlifyIntegrationClient that is made available in the context argument that is passed to our API handlers. Firstly, let’s define our API handler in a separate file src/handlers/connect.ts :
// src/handlers/connect.ts
import { UpstashIntegrationHandler } from "..";import { response } from "../utils";
const handler: UpstashIntegrationHandler = async (event, context) => {  const { apiKey, email } = JSON.parse(event.body ?? "{}");
  const { siteId, client } = context;
  if (!siteId) {    return response(400, "No site id was provided");  }
  if (!apiKey) {    return response(400, "No api key was provided");  }
  if (!email) {    return response(400, "No email was provided");  }
  try {    await client.updateSiteIntegration(siteId, {      apiKey,      email,      databases: [],    });  } catch {    return response(500, "Something went wrong");  }
  return response(200, "Successfully connected");};
export default handler;
You will notice how we make a call to client.updateSiteIntegration() which enables us to store the user’s Upstash connection details in the Integration API. It goes without saying that we store any integration context securely when the integration context is updated - which makes it safe to store items such as API keys.
We can then register this handler in src/index.ts :
// src/index.ts
import connectHandler from "./handlers/connect";
integration.addApiHandler("connect", connectHandler);
And now we can update our form to call this API handler:
// src/ui/routes/root.ts
onSubmit: async (state) => {  const { fetch, picker, integrationNavigation } = state;
  const apiKey = picker.getFormInputValue("connect-form", "upstash-api-key");  const email = picker.getFormInputValue("connect-form", "upstash-email");
  if (!apiKey || !email) {    return;  }
  const connectResponse = await fetch("connect", {    method: "POST",    body: JSON.stringify({      apiKey,      email,    }),  });
  if (connectResponse.ok) {    // Refresh the page, so we can reload the page with a button    // to integrate a database now we're connected    integrationNavigation.navigateTo("/");  }};
This is a great point take a look at our preview environment and ensure that the API handler we have created is working as we expect, with the page reloading after the form is submitted.
#Navigating to a new route
Now that we’re connected, we are able to create a call to action (CTA) to navigate users to a new route to start integrating with their Upstash Redis database. This means, we need to conditionally render elements on the page based on whether the user is connected or not. We will add the Add database CTA, but keep the display property of this element set to hidden for now. We will also update our connect-form to be hidden by default too.
// src/ui/routes/root.ts
section.addCard(  {    id: "use-integration-card",    title: "Your integrated databases",    display: "hidden",  },  (card) => {    card.addButton({      title: "Integrate database",      id: "add-database-button",      callback: (state) => {        const { integrationNavigation } = state;        integrationNavigation.navigateTo("/integrate-database");      },    });  });
To make elements conditionally render with the SDK, we use the onLoad function that is made available to each surface route. For this this onLoad function to know the current context of a users’ integration, we will need to create and make a call to a status API handler. This handler will simply tell us, if we’re connected and will also return a list of databases that have been integrated.
We can call this handler and then use the picker, that is part of our SurfaceState, to change the visibility state of elements.
// src/ui/routes/root.ts
route.onLoad(async (state) => {  const { fetch, picker } = state;
  const statusResponse = await fetch("status");
  const status = (await statusResponse.json()) as Status;
if (!status.connected) { const connectForm = picker.getElementById("connect-form"); if (connectForm) { connectForm.display = "visible"; } } else { const integrateCard = picker.getElementById("use-integration-card"); if (integrateCard) { integrateCard.display = "visible"; } }});#Integrating with a database
Hopefully you’re starting to see the pattern of how we can store and read our integration state, using API handlers and then conditionally render elements in our integration UI. Now we need to build out our route for /integrate-database where we will allow users to select from a dropdown of their Redis databases they have created in Upstash.
We’re going to add a form to this route with the id of integrate-form and a select field with an id of upstash-database . You can view the full code for this route here.
As with our / route, this route will also need an onLoad function to populate the select field with databases from the users’ Upstash account. We won’t show this dropdown until the user has integrated with at least one Upstash database, so we will also show some text for when a user first lands on this route without having added a database.
// src/routes/integrateDatabase.ts
route.onLoad(async (state) => {  const { fetch, picker } = state;
  const databasesResponse = await fetch("get-databases");
  const databases = (await databasesResponse.json()) as UpstashRedisDatabase[];
  const databasePicker = picker.getFormElementById<UIElementInputSelectOptions>("integrate-form", "upstash-database");
  if (databasePicker) {    // Populate dropdown with integrated databases    databasePicker.options = databases.map((database) => ({      label: database.database_name,      value: database.database_id,    }));  }
  // Only show dropdown if there are databases, otherwise show alternative description  if (databases?.length) {    const dropdown = picker.getElementById("upstash-database");    if (dropdown) {      dropdown.display = "visible";    }  } else {    const databaseDescription = picker.getElementById<UIElementInputTextOptions>("upstash-database-description");
    if (databaseDescription) {      databaseDescription.value =        "Integrate your first database and we will create your environment variables for you.";    }  }});
As you will see, this onLoad function makes a call to another API handler we have made called get-databases which contains the logic to use our saved integration context to make an authenticated call to Upstash:
// src/handlers/getDatabases.ts
import { response } from "../utils";
const handler: UpstashIntegrationHandler = async (event, context) => {  const { siteId, client } = context;
  // TODO - Add some request validation here
  const { config } = await client.getSiteIntegration(siteId);
  const { apiKey, email } = config;
  const upstashResponse = await fetch("https://api.upstash.com/v2/redis/databases", {    headers: {      Authorization: "Basic " + btoa(email + ":" + apiKey),    },  });
  // TODO - Add some error handling here
  const data = (await upstashResponse.json()) as UpstashRedisDatabase[];
  return response(200, JSON.stringify(data));};
We will also add some logic to our onSubmit function for our form so that we can effectively integrate the database by saving the Upstash endpoint and token as environment variables for the user and storing the id of the database we have integrated with in our integration configuration. This is achieved by calling another API handler which is responsible for updating our integration configuration and saving the environment variables.
Our onSubmit function for this form now looks like this:
// src/routes/integrateDatabase.ts
onSubmit: async (state) => {  const { fetch, picker, integrationNavigation } = state;
  const databaseId = picker.getFormInputValue("integrate-form", "upstash-database");
  const databasesResponse = await fetch("get-databases");
  const databases = (await databasesResponse.json()) as UpstashRedisDatabase[];
  const database = databases.find((database) => database.database_id === databaseId);
  if (!database) {    throw new Error("Database not found");  }
  const integrateResponse = await fetch("integrate", {    method: "POST",    body: JSON.stringify({      databaseId,      databaseName: database.database_name,    }),  });
if (integrateResponse.status === 200) { integrationNavigation.navigateTo("/"); } else { throw new Error("Something went wrong"); }};#Wiring it all together
Now that we’ve built the flow for integrating with a users’ Upstash databases, we can give them helpful code snippets in the integration UI. This will help guide users in quickly making use of the integration and the environment variables we have created. Firstly, we’ll create a function to generate our code snippet:
// src/utils/netlify.ts
export const generateCodeSnippet = (urlEnvVarName: string, tokenEnvVarName: string) =>  `import { Redis } from "https://deno.land/x/upstash_redis@v1.14.0/mod.ts";
export default async () => {  const redis = new Redis({    url: new URL(      \`https://\${Deno.env.get("${urlEnvVarName}")}\`,    ).toString(),    token: Deno.env.get("${tokenEnvVarName}"),  });
  const counter = await redis.incr("edge_counter");
  return new Response(counter);};
export const config = {  path: "/counter",};`;
Then we can add a dropdown in our / route which will show all of the integrated caches, when an option is selected from this dropdown we can execute the following callback in our Select field:
// src/routes/root.ts
// inside our `use-integration-card` on an inputSelectcallback: async (state, value) => {  const { picker, fetch } = state;
  const getDatabasesResponse = await fetch("get-databases");
  const databases = (await getDatabasesResponse.json()) as UpstashRedisDatabase[];
  const database = databases.find((database) => database.database_id === value);
  if (!database) {    throw new Error("Database not found");  }
  const urlEnvVarName = getEnvVarName(database.database_name, "URL");  const tokenEnvVarName = getEnvVarName(database.database_name, "TOKEN");
  const snippetElement = picker.getElementById<UIElementCodeSnippetOptions>("upstash-snippet");
  if (snippetElement) {    snippetElement.code = generateCodeSnippet(urlEnvVarName, tokenEnvVarName);    snippetElement.display = "visible";  }};
The corresponding code snippet element can be added as follows:
// src/routes/root.ts
// inside our `use-integration-card`card.addCodeSnippet({ language: "js", display: "hidden", id: "upstash-snippet", code: "",});#And that’s it!
We hope that this post helps give you some ideas about how you can approach writing an integration and that there are some useful examples for how you can write your integration with the Netlify SDK.
Click the button below if you want to try out this integration and start using it on one of your sites. You could even use this integration as a template to build your own.

If you want to learn more about our SDK, please visit our docs where you will find more in depth explanations on some of the concepts we explored with this integration.